Canadian summers never last long, which is why you have to make the most of them! And what better way to enjoy the beautiful weather than with a pergola? With room for the sun to shine through its spaced wooden beams, it's sure to brighten your day. Here's a step-by-step guide on how to build your own.
Discover the 3 different types of pergolas

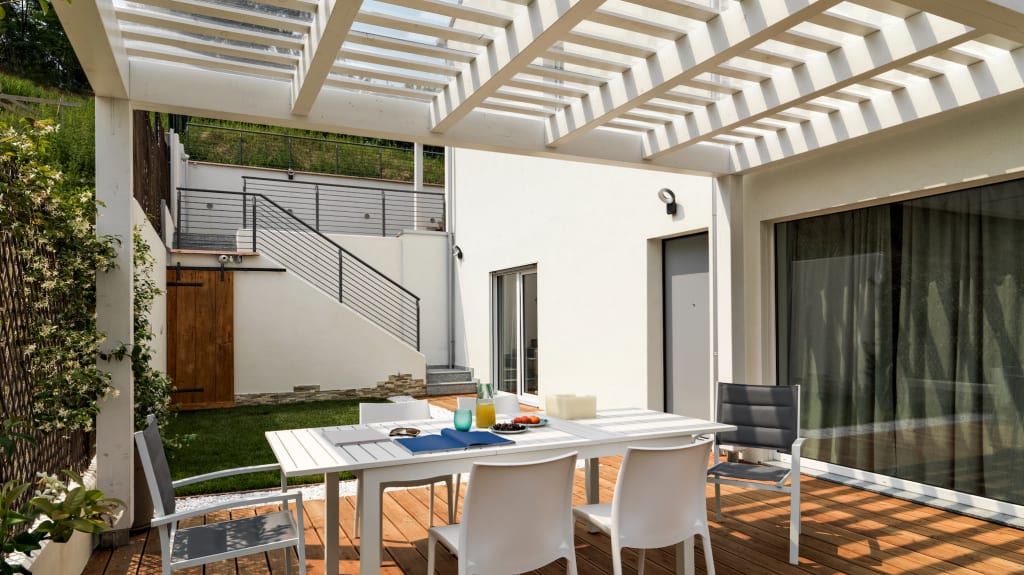
An attached pergola is connected to the side of the house. The idea is to provide shade and privacy while adding a decorative element to the outside of the house. It's perfect for creating a dining area or outdoor living room, as well as a nice transition from outside to inside.

There's also a freestanding pergola, which isn't attached to anything. It usually consists of 4 to 6 vertical columns that support crossbeams and rafters. It's often used to create a focal point in a garden, providing shade and privacy.
A flat roof gives off a modern look and is great for contemporary-style homes. It's also easier to build and maintain. On the other hand, a pergola with a slanted roof can add a touch of charm to more rustic houses. It also provides more protection against rain or snow. Ultimately, your choice of roof depends on your needs and what kind of aesthetic you're looking for.
What are the advantages of pergolas?

Unlike a gazebo (which is a small pavilion with a roof), a pergola provides the perfect balance between sun and shade. With its latticed roof and sturdy support, it lets just enough sunlight in while providing shade on hot days. You can add retractable awnings or curtains to control how much shade you'd like.
A pergola can help improve the aesthetic of your outdoor space in different ways. It can act as a support for climbing plants, which adds colour and texture, apart from adding visual interest in and of itself. You can also customize a pergola to match the style of your home, which makes it a great complement. They go particularly well with eco-responsible properties.

A pergola also functions as an extension of your home and living space. With some comfortable chairs, lighting and protection from the elements, your pergola can become a place to entertain. It's perfect for family reunions, celebrating birthdays with friends or simply enjoying the outdoors.
What you'll need to make your own wooden pergola

There are many different kinds of wood you can use to build a high-quality pergola: cedar, redwood, cypress, pressure-treated pine or teak. These are popular choices, since they're naturally resistant to rot, pests and weather. Cedar is particularly favoured because of its light weight and unique grain pattern that adds character to outdoor spaces. You can also use Enviroboards, an eco-friendly construction material that is built to last.

You can also plan out how you'll decorate your pergola: string lights or lanterns, climbing plants, curtains, screens and decorative woodwork. Give it a look that fits well with your surroundings, or make it stand out to create a centrepiece.
Choose the right spot

You'll need to do a bit of planning to find the perfect spot for your pergola. Do you want it to be a focal point, or is functionality the goal? Make note of how much sun and shade the spot gets, how close it is to your house, the view you get and which way the wind blows. Remember to identify any obstacles that might prevent you from putting it there.
Do the dimensions you've chosen work there? If you're looking to use it as a dining space, measure your patio furniture and add a bit of extra space so you can move around the table. Also make note of the height and how it will affect your outdoor space.
Designing your own wooden pergola

To design your pergola, you'll need to do the following:
Determine what you'll use it for and where you'll put it.
Decide on its size and shape.
Buy the materials you need, paying attention to their durability and weather resistance.
Create a design plan, either yourself or with the help of a contractor.
Clear and level the area where your pergola will be.
You'll also have to make a final decision about its size. The most common sizes are 3 × 3 m (10 × 10 ft), 3 × 3.66 m (10 × 12 ft) and 3.66 × 3.66 m (12 × 12 ft), but you can choose whatever size you want. Do you prefer a classic style with spaced beams and rafters, or a more rustic one with plants and vines? Once you make your decision, you'll have to stick with it.
Preparing your materials for construction

To make sure that the wood is cut properly, prepare a cut list. Use a measuring tape, a try square and a pencil to mark the cuts you're going to make in the wood. Cut with a circular saw or mitre saw, making sure to follow the lines carefully. Make sure to use a sharp blade and that the wood is stable and won't move. Sand the ends to make them smooth.
Make sure to use high-quality wood that's weather and rot resistant. Regularly cleaning, sealing and staining the wood will also help protect it from UV damage. Remove all dirt and debris that accumulates on the surface in summer and in winter.
Carefully clean the wood before painting and staining it. Start by applying a coat of primer. This will ensure the paint adheres better. Once the primer dries, apply the paint with a brush or roller. Then, use a brush or sprayer to stain the wood. Note the manufacturer's guidelines for the number of coats and drying time.
Assembling the pergola

Here's a step-by-step guide on how to build your pergola:
On the ground, mark where the posts will go.
Dig holes for the posts.
Pour concrete in and set the posts. Feel free to get help from a professional for this step.
Secure the beams to the posts with screws.
Secure the rafters to the beams with screws.
Put up your other additions, like shade cloths, curtains or lattices for climbing plants.
It's important that the posts are firmly anchored in the ground to ensure that your pergola is strong and stable. You can also use diagonal struts to reinforce it. Make sure to space out the beams correctly to evenly distribute the weight.
Check periodically for signs of rot or damage. You can add locally produced materials such as composite cladding to help keep the pergola in good condition for years to come. You can also use aluminum posts for additional support.
Now, all that's left are the decorative touches for your pergola. Climbing plants such as roses, ivy and jasmine can give a nice, natural look. A canopy can add shade and colour, and hanging baskets or lanterns can add a touch of elegance to this new living space. Afterwards, you'll just need to add some outdoor furniture and cushions that fit your style.
With a Verified Contractor and an experienced Advisor, all the odds are in your favour for making your project successful! Visit the RenoAssistance website or call 1-877-736-6360 to speak with a Renovation Advisor now.


